


If you’ve ever tried Frog Pose (Mandukasana), you probably fall into one of two camps—you either love the deep stretch or absolutely dread it. And honestly? I get it. Frog Pose is intense. It targets your inner thighs, hips, and lower back in ways most other yoga poses don’t.
But here’s the thing: if you sit for long hours, run, or lift weights, your hips are probably tighter than you think. That’s where Frog Pose comes in. It’s one of the best yoga poses to open up tight hips, relieve lower back tension, and improve flexibility—but only if done correctly and safely.
In this guide, I’ll walk you through everything you need to know about Frog Pose: its benefits, step-by-step instructions, common mistakes, and how to modify it for your body. So, whether you love it or hate it, let’s make it work for you.
Benefits of Frog Pose (Mandukasana)

Frog Pose is one of those yoga postures that looks simple but delivers a deep, powerful stretch. If you’ve ever felt tightness in your hips or inner thighs, this pose is a game-changer. It works by opening up the hip flexors, groin, and lower back, making it especially beneficial for anyone who spends long hours sitting or doing high-impact workouts like running or weightlifting.
One of the biggest benefits of Frog Pose is hip flexibility. Our hips tend to get stiff from everyday activities—whether it’s sitting at a desk, driving, or even working out. This pose helps increase mobility and counteract that stiffness, leading to better posture and movement efficiency. Over time, it can even help prevent injuries caused by tight hip muscles.
Frog Pose is also great for relieving lower back tension. By stretching the inner thighs and groin, it reduces strain on the lower back, which often compensates for tight hips. If you’ve ever experienced lower back discomfort, incorporating this pose into your routine might provide some much-needed relief.
Beyond the physical benefits, Frog Pose is a powerful stress reliever. Holding the stretch encourages deep, controlled breathing, which helps calm the nervous system and reduce tension—both physically and mentally. Many yogis even use it as a mindfulness practice, allowing them to slow down, focus on their breath, and release stored-up tension.
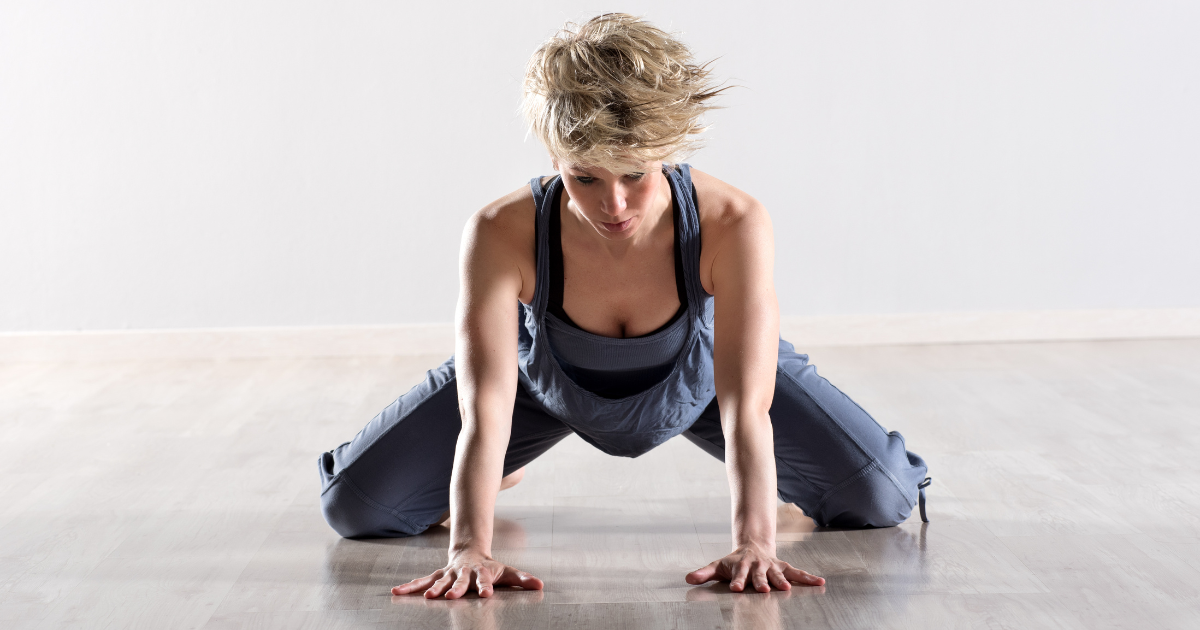
Step-by-Step Guide: How to Do Frog Pose
Follow these simple steps to get into Frog Pose (Mandukasana) safely and effectively:
- Start in a tabletop position by getting on all fours with your wrists under your shoulders and knees under your hips.
- Slowly move your knees apart, keeping them in line with your hips. Stop when you feel a deep stretch in your inner thighs.
- Keep your feet active by flexing them, with your toes pointing outward. This protects your knees.
- Lower onto your forearms by placing your elbows on the yoga mat or a block for support. Keep your chest lifted and spine neutral.
- Lightly activate your abs to prevent your lower back from arching too much.
- Relax your hips and let them sink naturally toward the mat without forcing them.
- Breathe and hold. Stay in the pose for 30 seconds to 2 minutes, breathing deeply to release tension.
- To exit the post, bring your knees together gently and push back into Child’s Pose to relax.
Pro Tip: If the stretch feels too intense, place a blanket under your knees or keep your knees slightly closer together.
How to Prepare for Frog Pose
Before diving into Frog Pose, it’s important to warm up your hips and inner thighs to prevent strain or discomfort. Since this is a deep stretch, jumping into it without preparation can feel too intense, especially if you have tight hips.
Start with gentle hip-openers like Butterfly Pose (Baddha Konasana) or Seated Wide-Leg Forward Fold (Upavistha Konasana) to loosen up your inner thighs. Low Lunge (Anjaneyasana) is also a great way to stretch your hip flexors and get your body ready. If you’re feeling extra tight, spend a few minutes in Child’s Pose to relax and prepare mentally.

Props can also make Frog Pose more comfortable. Placing a blanket under your knees adds cushioning, while using a bolster under your chest can help you ease into the stretch gradually. The key is to listen to your body—never force your knees too wide too soon. With the right prep, you’ll be able to settle into the pose more comfortably and get the full benefits.
Common Mistakes and How to Fix Them
Frog Pose is powerful, but doing it incorrectly can lead to discomfort or injury. Here are some common mistakes to watch out for:
One of the biggest mistakes is arching the lower back too much. While it may feel like you’re going deeper, this puts unnecessary strain on the spine. Instead, engage your core and keep a neutral spine to protect your back.
Another mistake is forcing the knees too wide, too quickly. This can overstretch the inner thighs and put pressure on the knees. Instead, ease into the stretch gradually, and if needed, keep your knees closer together at first.
Some people also tense up and hold their breath while in the pose. This makes it harder to relax into the stretch. Instead, focus on deep, steady breathing to release tension and allow your hips to open naturally.
Modifications and Variations of Frog Pose
1. Supported Frog Pose (For Beginners or Tight Hips)
If Frog Pose feels too intense, using props can help. Place a bolster or folded blanket under your chest for support, allowing your body to relax gradually. You can also keep your knees slightly closer together instead of going for a deep stretch.
This modification reduces pressure on the hips and knees while still providing a good stretch. Hold the pose for 30 seconds to 1 minute, breathing deeply to release tension.
2. Half Frog Pose (Ardha Mandukasana) for Knee Sensitivity

If full Frog Pose is uncomfortable on your knees, try Half Frog Pose. Start by lying on your stomach and bend one knee out to the side at a 90-degree angle, keeping the other leg extended straight back. Rest your forehead on your hands or a block and breathe deeply.
This variation gives a similar hip and inner thigh stretch but is gentler on the knees and lower back. Repeat on both sides for 30-60 seconds.
3. Active Frog Pose (For a Deeper Stretch)
For those who want a more advanced version, add gentle movement to deepen the stretch. Start in Frog Pose, then gently rock forward and backward to increase mobility in the hips.
Another option is to lift your chest and extend your arms forward, creating an active stretch. Keep your core engaged to avoid lower back strain.
This variation is great for advanced yogis looking to enhance flexibility. Move slowly and mindfully, holding the stretch for 1-2 minutes.
4. Wall-Supported Frog Pose (For Extra Support and Control)
If you struggle with balance or alignment, try using a wall for support. Position yourself with your feet pressed against a wall while in Frog Pose, keeping your knees bent at a 90-degree angle. The wall helps you maintain proper form and prevents overstretching.
This variation allows for more controlled movement and deeper relaxation while reducing pressure on the knees. Hold for 30-60 seconds and focus on slow, steady breathing.
5. Twisted Frog Pose (For a Spinal and Hip Release)
For a deeper stretch in the spine and hips, try adding a twist. Start in Frog Pose, then place one hand on the mat and reach the other arm toward the ceiling, rotating your torso gently. Hold for a few breaths before switching sides.
This variation helps release tension in the lower back, hips, and obliques, making it a great addition to a mobility routine. Keep the movement slow and controlled, holding each side for 30 seconds to 1 minute.
Risks and Precautions
While Frog Pose is an excellent hip opener, it can also be intense and demanding, especially if your hips, knees, or lower back are tight or sensitive. Pushing too far can lead to joint strain or muscle discomfort, so it’s important to approach the pose mindfully.
One of the main risks is knee strain. Since the pose involves a deep external rotation of the hips, it can put pressure on the knee joints. To avoid injury, always keep your feet flexed rather than pointing your toes, and use a folded blanket or cushion under your knees for extra support if needed. If you feel sharp pain in your knees, ease out of the pose immediately.
People with hip injuries, groin pain, or recent knee surgeries should either avoid Frog Pose or modify it with Half Frog Pose or a supported variation. As always, listen to your body and never push into discomfort—Frog Pose should feel like a deep stretch, not pain.
Frog Pose FAQs
How long should I hold Frog Pose?
For beginners, start with 30 seconds to 1 minute and gradually increase to 1-2 minutes as your flexibility improves. The key is to focus on deep breathing and not force the stretch.
Why is Frog Pose so intense?
Frog Pose deeply stretches the inner thighs, groin, and hip flexors, areas that are often tight from sitting, running, or weightlifting. If it feels too intense, start with a modified version or use props for support.
Can I do Frog Pose every day?
Yes, but listen to your body. Practicing it daily can improve hip flexibility and mobility, but if you feel soreness, take a break or reduce the duration.
What if my knees hurt in Frog Pose?
Try placing a folded blanket or cushion under your knees for extra support. Keeping your feet flexed also reduces strain on the knee joints. If pain persists, try Half Frog Pose instead.
Is Frog Pose safe for beginners?
Yes, but it’s important to start slowly. Beginners should keep their knees closer together, use props for support, and focus on proper alignment to prevent strain or injury.
The Bottom Line
Frog Pose may feel intense at first, but it’s one of the best ways to open up your hips, release tension, and improve flexibility—especially if you sit a lot or have tight muscles. The key is to ease into it, listen to your body, and modify as needed so you can reap the benefits without discomfort.
Whether you’re using it as a post-workout stretch, a way to improve mobility, or just to unwind after a long day, consistency is what makes the difference. Start with short holds, breathe deeply, and gradually build up over time.
Now it’s your turn—give Frog Pose a try and see how it feels! And if you have any questions or experiences to share, drop them in the comments below. I’d love to hear how it’s working for you!
