


Warrior poses (Virabhadrasana I, II, and III) are yoga staples that combine strength, balance, and focus. Whether you’re aiming to improve posture, open your hips, or challenge your stability, these powerful poses have something for everyone.
In this guide, we’ll break down each pose, share tips for perfect alignment, and explore their benefits and rich history. Roll out your mat, channel your inner warrior, and let’s dive into the world of Warrior Poses!
Benefits of Practicing Warrior Poses
Practicing warrior poses regularly can transform your body and mind, empowering you to feel stronger, steadier, and more focused every day.
Builds strength and stamina. Warrior poses are a full-body workout. They engage your legs, arms, core, and back, helping to build strength and endurance. Warrior I and II strengthen your thighs and shoulders, while Warrior III challenges your balance and core stability. These poses also improve muscle tone, making them perfect for building a strong, grounded foundation.
Improves flexibility and balance. Warrior poses help open up the hips, chest, and shoulders, improving overall flexibility. Warrior III, in particular, enhances balance and coordination by requiring focus and stability. Over time, these poses can increase your range of motion and improve your posture, making daily movements more fluid and confident.
Boosts mental focus and resilience. Like many yoga poses, the warrior poses promote a sense of calm and focus. Holding these strong postures trains your mind to stay present and resilient, even when challenges arise—on and off the mat. Warrior poses are not just about physical strength; they cultivate mental fortitude, helping you stay centered in life’s battles.
How to Do Warrior I (Virabhadrasana I)

- Start in Mountain Pose (Tadasana) with your feet hip-width apart, shoulders relaxed, and arms by your sides. Take a deep breath to center yourself.
- Step your left foot back about 3-4 feet, keeping your right foot forward.
- Angle your left foot at about 45 degrees and press firmly through the outer edge of your back foot. Align your front heel with the arch of your back foot for stability.
- Bend your right knee until it’s directly over your ankle, forming a 90-degree angle. Make sure your knee doesn’t extend past your toes, and keep your back leg straight and active.
- Raise your arms overhead with your palms facing each other or touching. Keep your shoulders relaxed and away from your ears as you reach upward.
- Rotate your hips and torso to face the front of your mat. Engage your core muscles to maintain balance and stability, ensuring your spine stays elongated.
- Hold the pose for 3-5 deep breaths, feeling the stretch through your legs, hips, and shoulders.
Common Mistakes of Warrior I
A common mistake in Warrior I is failing to square the hips forward. To fix this, shorten your stance or adjust the angle of your back foot to help align your hips. Another issue is allowing the front knee to extend past the ankle, which can strain the joint. Always check that your knee is stacked over your ankle and your weight is evenly distributed.
Lastly, many practitioners overarch their lower back, leading to discomfort or strain. Engage your core and gently tuck your pelvis to support your spine and maintain proper posture. By being mindful of these adjustments, you can perform Warrior I safely and effectively.
How to Do Warrior II (Virabhadrasana II)

- Begin in Mountain Pose (Tadasana), standing tall with your feet together and arms relaxed by your sides. Take a deep breath to center yourself.
- Step your left foot back about 3-4 feet, keeping your right foot forward.
- Turn your left foot out at a 90-degree angle so it’s parallel to the back edge of the mat. Align your front heel with the arch of your back foot.
- Bend your right knee until it’s directly over your ankle, forming a 90-degree angle. Keep your back leg straight and strong, pressing firmly into the outer edge of your left foot.
- Stretch your arms out to the sides at shoulder height, palms facing down. Ensure your shoulders stay relaxed and your arms are parallel to the floor.
- Gaze softly over your right fingertips, keeping your neck long and relaxed. Engage your core and lift through your chest, maintaining a strong yet steady posture.
- Hold the pose for 3-5 deep breaths, feeling the strength in your legs and the openness in your chest and shoulders.
Common Mistakes of Warrior II
One common mistake in Warrior II is allowing the front knee to collapse inward, which can strain the joint. To avoid this, ensure your knee is tracking directly over your ankle and pointing toward your second toe.
Another issue is leaning the torso forward, which disrupts balance and alignment. Keep your chest centered over your hips, and avoid leaning into the front leg.
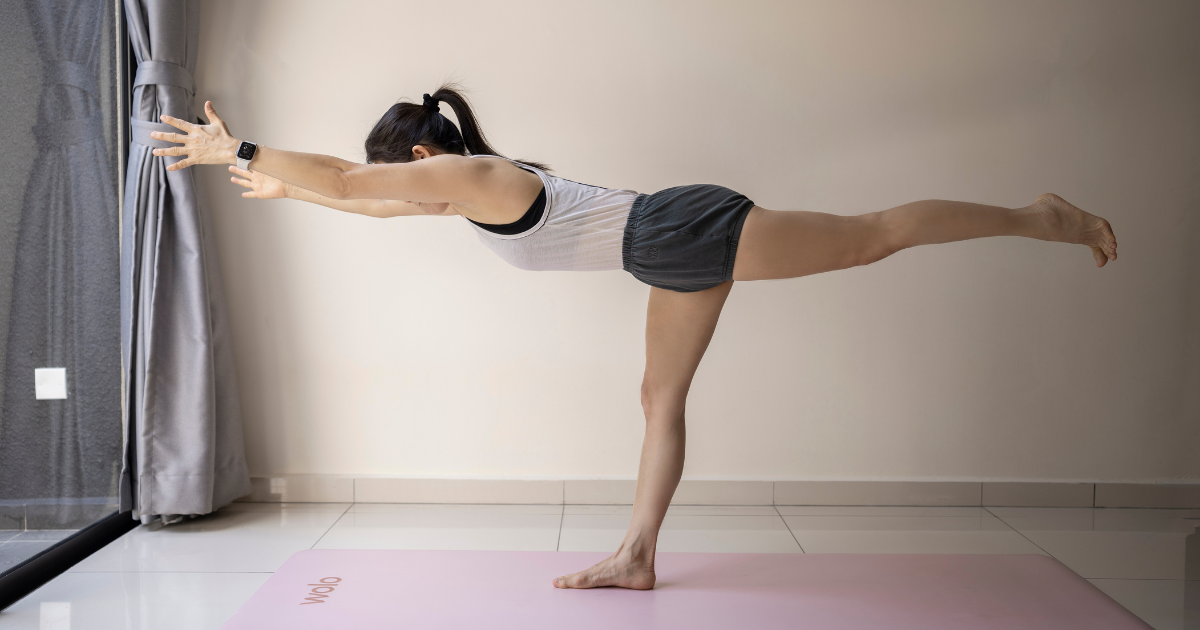
How to Do Warrior III (Virabhadrasana III)

- Begin in Mountain Pose (Tadasana), standing tall with your feet together and arms relaxed by your sides. Take a deep breath to steady your focus.
- Step your right foot forward and shift your weight onto it, keeping a slight bend in your knee to maintain balance.
- Lift your left foot off the ground, engaging your core and glutes to stabilize.
- Hinge forward at your hips as your left leg extends straight back, keeping your hips level and your torso parallel to the floor.
- Stretch your arms forward in line with your ears, palms facing each other, or keep them at your sides for balance.
- Engage your standing leg, pressing firmly into the ground while lengthening through your spine and reaching through your extended leg. Keep your gaze slightly forward or down to maintain alignment.
- Hold the pose for 3-5 deep breaths, focusing on finding balance and strength in your body. Slowly return to standing and repeat on the other side.
Common Mistakes of Warrior III
A common mistake in Warrior III is letting the hips open to one side, which throws off balance and alignment. To correct this, imagine your hip bones pointing straight down and adjust your raised leg accordingly.
Many practitioners also lock their standing knee, reducing stability. Keep a micro-bend in your knee to protect the joint and enhance control. With practice and attention to these details, Warrior III can become a powerful and graceful part of your yoga flow.
Historical and Mythological Background
The Warrior poses in yoga are inspired by the tale of Virabhadra, a fierce warrior created by Lord Shiva in Hindu mythology. According to the story, Virabhadra was born out of Shiva’s intense grief and anger after the death of his beloved wife, Sati. In his rage, Shiva created the mighty Virabhadra to avenge her death. With strength, determination, and unwavering focus, Virabhadra defeated his enemies, embodying the qualities of courage and resilience.
In yoga, the Warrior poses—Virabhadrasana I, II, and III—represent the spirit of this legendary warrior. They invite practitioners to tap into their inner strength, focus, and perseverance, cultivating a sense of power, peace, and fortitude. These poses are a reminder of our ability to overcome challenges and face life's battles with grace and determination.
Incorporating Warrior Poses into Your Practice
Warrior poses are versatile and can be integrated into your practice in many ways, whether you’re doing a quick morning stretch or a full yoga session. To start, include Warrior I and II in your warm-up to activate your legs, open your hips, and build focus. These poses also pair well with Sun Salutations or standing sequences, adding strength and stability to your flow.
For a more balanced practice, combine Warrior III with poses that challenge your core and improve coordination, like Chair Pose or Tree Pose. This helps build the strength and focus needed to maintain stability in Warrior III.
If you’re short on time, practicing a Warrior sequence—moving from Warrior I to Warrior II and finishing with Warrior III—provides a full-body workout in just a few minutes. Focus on mindful transitions to improve balance and flow.
To deepen your practice, hold each Warrior pose for 5-10 breaths, gradually building endurance and awareness in each position. Remember to listen to your body and adjust your alignment to avoid strain.
Preparing for Warrior Poses
Before practicing Warrior poses, ensure your body is warmed up and ready. Start with gentle stretches like Cat-Cow or Downward Dog to loosen your spine, shoulders, and hips. Include lunges or low squats to activate your legs and prepare for the deep bends in Warrior poses. It’s also helpful to engage in light cardio or dynamic stretching to increase blood flow and mobility.

Wear comfortable, breathable clothing that allows free movement, and use a yoga mat to ensure a stable grip on your feet. Have props like yoga blocks handy if you need additional support, especially for balance-intensive poses like Warrior III.
Potential Risks and How to Avoid Them
While Warrior poses are generally safe, improper alignment can lead to discomfort or injury. Overextending the front knee in Warrior I and II can strain your joint, so ensure your knee stays directly above your ankle. In Warrior III, poor balance or locking the standing knee can lead to instability. Always keep a slight bend in your knee and engage your core for support.
For those with existing hip, knee, or back issues, consult a healthcare professional or yoga instructor before attempting these poses. Practicing mindfully and listening to your body is key to avoiding injury and enjoying a safe, effective yoga session.
Channel Your Inner Warrior
Warrior poses are powerful tools for building strength, balance, and mental focus. By practicing Warrior I, II, and III with proper alignment, you can enhance your flexibility, stability, and confidence both on and off the mat. Remember to prepare your body with a warm-up, stay mindful of alignment to avoid injury, and challenge yourself gradually.
Whether you're a beginner or an experienced yogi, embracing the Warrior poses will empower you to move with purpose and resilience. Keep practicing, stay patient with yourself, and feel the transformation unfold as you channel your inner warrior!
