


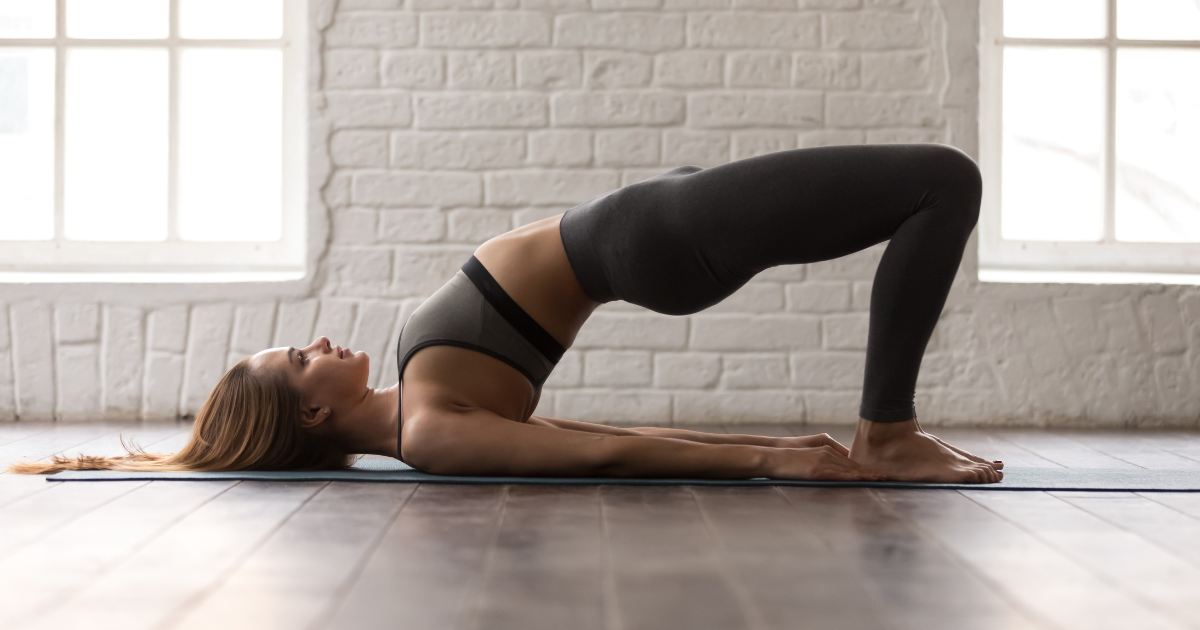
Bridge Pose, also known as Setu Bandha, is one of those yoga poses that looks simple but delivers powerful benefits. I love how it strengthens my back, glutes, and core while opening up my chest and shoulders—it’s a game-changer if you spend hours sitting.
Whether you’re looking to improve flexibility, relieve back pain, or just add a great pose to your routine, Bridge Pose is a must-try. In this guide, I’l
l walk you through how to do it correctly, common mistakes to avoid, and ways to modify it for your level.
Ready to unlock the benefits? Let’s dive in!
Benefits of Bridge Pose

Whether you want to build strength, improve flexibility, or simply release tension, Bridge Pose has something for you. I’ve personally felt the difference in my posture and energy levels after making it a regular part of my routine. Here’s why you should give it a try:
- Strengthens your core and glutes. Bridge Pose engages your core, glutes, and hamstrings, helping you build strength and stability. A strong core supports better posture and reduces the risk of lower back pain.
- Improves spinal flexibility and posture. By lifting your hips and opening your chest, this pose counteracts the negative effects of prolonged sitting. It helps realign your spine, improve posture, and increase flexibility in your back.
- Relieves lower back pain. When done correctly, Bridge Pose stretches and strengthens the lower back muscles, relieving tension and stiffness caused by poor posture or long hours at a desk.
- Boosts circulation and energy. Elevating your hips promotes better blood flow to the heart and brain, leaving you feeling refreshed and energized. It also stimulates the nervous system, improving focus and relaxation.
- Calms the mind and reduces stress. This gentle backbend activates the parasympathetic nervous system, which helps lower stress levels, regulate breathing, and promote a sense of calm. Perfect for unwinding after a long day!
How and What to Prepare for Bridge Pose
Before jumping into Bridge Pose, setting yourself up properly can make all the difference. First, choose a comfortable, non-slip yoga mat to provide support and prevent your feet from sliding. If you have tight shoulders or lower back discomfort, grab a yoga block—placing it under your sacrum for a supported version can help ease tension.
Warming up is key! Start with gentle stretches like Cat-Cow, Supine Twist, or Reclined Butterfly to loosen up your spine and hips. Pay attention to your breathing—slow, deep inhales and exhales will help you stay relaxed and engaged during the pose.
Wear comfortable clothing that allows you to move freely without restricting your hips or shoulders. Lastly, set an intention—whether it’s improving flexibility, strengthening your core, or just unwinding after a long day, a mindful approach makes the practice even more beneficial. Now, you’re ready to bridge the gap between stiffness and strength!
Step-by-Step Instructions: How to Do Bridge Pose

- Lie on your back with your knees bent and feet flat on the floor, hip-width apart.
- Keep your arms relaxed by your sides, palms facing down.
- Position your feet correctly by placing them close enough to your glutes so that your fingertips can just touch your heels. Keep your knees aligned with your hips.
- Engage your core and glutes to create stability before lifting. This helps protect your lower back and ensures proper activation of your muscles.
- Press into your feet and lift your hips toward the ceiling on an inhale.
- Keep your thighs parallel and avoid letting your knees splay outward.
- Roll your shoulders back and press your arms into the mat. This opens your chest and provides better support for your backbend. You can clasp your hands underneath you or keep them flat on the floor.
- Keep your chin slightly tucked and gaze straight up to maintain a neutral neck position. Avoid looking side to side.
- Hold the pose for a few breaths, keeping steady, deep inhales and exhales.
- Focus on lifting your hips higher with each breath while maintaining control.
- To release, exhale and slowly lower your spine down, vertebra by vertebra, until your hips rest on the floor.
- Relax completely before repeating or moving into another pose.
Common Mistakes & How to Fix Them
Even though Bridge Pose looks simple, small mistakes can reduce its effectiveness or even lead to discomfort. One common mistake is arching the lower back too much, which can strain your spine instead of strengthening it. To fix this, engage your core and glutes before lifting, and focus on a controlled, even lift rather than just pushing your hips as high as possible.
Another mistake is letting the knees splay outward, which reduces stability and puts pressure on the lower back. Keep your feet hip-width apart and press evenly into the ground to maintain proper alignment.
Many people also collapse their shoulders instead of rolling them back, limiting chest expansion. To fix this, actively press your arms into the mat and lift through your sternum.
Lastly, holding your breath can create tension. Focus on steady inhales and exhales, allowing your breath to guide your movement for a smoother, more effective pose.
Bridge Pose Modifications and Variations
Bridge Pose can be adjusted to suit your flexibility, strength, and comfort level. Whether you're a beginner looking for support or an advanced yogi wanting to deepen the stretch, here are some variations to try:
1. Hands-Free Bridge Pose
Instead of clasping your hands under your back, keep arms flat on the floor or place them on your hips for extra support. This modification reduces pressure on the shoulders while still strengthening the glutes and core.
Best for: Yogis with shoulder discomfort
2. One-Legged Bridge Pose

From a standard Bridge Pose, lift one leg toward the ceiling, keeping your hips level. This challenges your balance and engages the core even more. Try this when you’re ready to progress and add intensity.
Best for: Building strength and stability
3. Dynamic Bridge
Instead of holding still, lift and lower your hips with each breath, flowing between movement and stillness. This variation helps increase mobility and works well in a warm-up sequence.
Best for: Warming up or adding movement
4. Elevated Bridge Pose
Place your feet on a yoga block or step to increase hip elevation and intensify the backbend. This is great if you’re preparing for deeper backbends like Wheel Pose.
Best for: Advanced yogis who want a deeper engagement
5. Bridge to Wheel Pose Transition
From Bridge, press firmly into your hands and feet, then lift into Wheel Pose if your flexibility allows. This is a great way to train for deeper backbends while maintaining proper alignment.
Best for: Those working toward Wheel Pose
Risks and Precautions
While Bridge Pose is generally safe, it’s important to practice with proper alignment to avoid discomfort or injury. If you have lower back pain or spinal issues, avoid forcing the lift—engage your core and use a yoga block for support to reduce strain. Always lift gradually and avoid over-arching your lower back.
If you have neck injuries, be extra cautious. Keep your gaze straight up and avoid turning your head while in the pose. Placing a folded blanket under your shoulders can help protect your neck.
Pregnant practitioners should practice a supported version using a block under the sacrum or skip the pose if it feels uncomfortable. If you experience knee pain, check that your feet are firmly planted and your knees stay aligned with your hips. Listen to your body—if something feels off, adjust or skip the pose.
Bridge Pose FAQs
What is Bridge Pose good for?
Bridge Pose is great for strengthening the glutes, core, and lower back, improving spinal flexibility, and relieving tension in the chest and shoulders. It also helps counteract the effects of prolonged sitting, improves posture, and can even promote relaxation by activating the parasympathetic nervous system.
Why is Bridge Pose so hard?
Bridge Pose can feel challenging because it requires core and glute engagement, as well as proper alignment to avoid strain. If your lower back takes over instead of your core and legs, it can feel uncomfortable.
Is Bridge Pose a heart opener?
Yes! Bridge Pose is considered a gentle heart opener because it lifts the chest and expands the front body. Unlike deep backbends like Wheel Pose, Bridge Pose offers a more accessible way to open the chest, improving breath capacity and posture.
Which chakra is Bridge Pose?
Bridge Pose is associated with the Heart Chakra (Anahata) and Root Chakra (Muladhara). The chest-opening aspect stimulates the Heart Chakra, promoting emotional balance and openness, while the grounding effect helps activate the Root Chakra, enhancing stability and security.
Can beginners do Bridge Pose?
Absolutely! Bridge Pose is beginner-friendly, and you can modify it by keeping your hands by your sides, using a yoga block under your sacrum, or lifting your hips just slightly. Focus on engaging your core and moving with your breath to make it more comfortable.
The Bottom Line
Bridge Pose is a powerful yet accessible yoga pose that strengthens your core, improves posture, and relieves tension in your back and shoulders. Whether you’re a beginner or an advanced yogi, there’s a variation to suit your needs. The key is proper alignment, steady breathing, and mindful movement. Avoid common mistakes, listen to your body, and use modifications when needed.
Now it’s your turn—roll out your mat and give it a try! With consistent practice, you’ll feel stronger, more flexible, and more energized. Ready to take your yoga journey further? Explore more poses and deepen your practice!